
In an era where our smartphones hold our financial lives, personal memories, and private communications, losing a device to theft is a nightmare scenario. It is no longer just about the cost of the hardware; it is about the potential access thieves might gain to your banking apps and personal identity. At dailypedia24, we understand that keeping your digital life secure is a top priority for our readers. The good news is that Apple has introduced several robust features designed specifically to thwart thieves, but they are not always enabled by default. To truly safeguard your device, you must dive into your iphone settings and configure them correctly before a crisis occurs. This guide will walk you through the essential changes you need to make today to ensure your device remains a fortress, even if it falls into the wrong hands.
Why Default Configurations Are Not Enough
Many users assume that simply having a passcode and Face ID is enough to deter criminals. However, sophisticated thieves have developed methods to bypass basic security measures, often by “shoulder surfing” to learn your passcode before snatching the device. Once they have your passcode, they can typically change your Apple ID password, turn off “Find My,” and essentially lock you out of your own digital life within minutes.
This is why relying on the out-of-the-box configuration is dangerous. You need to take a proactive approach by layering multiple security barriers. By adjusting specific iphone settings, you can make it significantly harder for a thief to resell your phone or access your data, often rendering the stolen device useless to them.
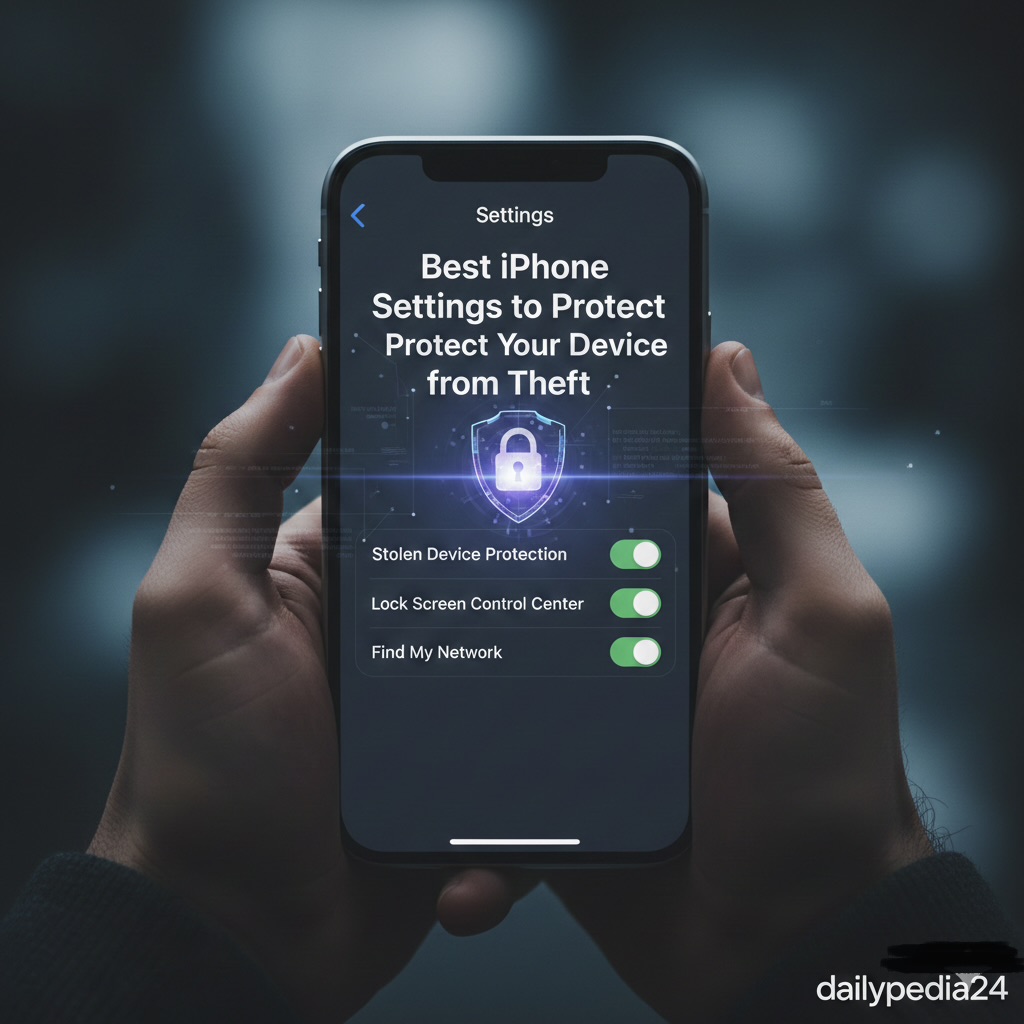
1. Enable Stolen Device Protection Immediately
The most critical addition to iOS in recent years is Stolen Device Protection. This feature was specifically designed to counter the “passcode theft” strategy. When enabled, this setting adds an extra layer of security when your iPhone is away from familiar locations, such as your home or workplace.
If a thief tries to access critical security areas—like changing your Apple ID password or viewing stored passwords in your Keychain—the phone will demand Face ID or Touch ID authentication. A passcode fallback is not allowed. Furthermore, for highly sensitive actions, it imposes a one-hour security delay.
How to Enable It:
1. Open the Settings app on your iPhone.
2. Scroll down and tap on “Face ID & Passcode.”
3. Enter your current device passcode.
4. Scroll down to find “Stolen Device Protection” and tap to turn it on.
We recommend setting the protection to “Always” rather than just “Away from Familiar Locations” for maximum security. This ensures that even if a thief follows you home or knows where you live, they cannot bypass your biometric security.
2. Disable Control Center Access on the Lock Screen
One of the first things a thief will do after snatching an iPhone is enable Airplane Mode. This instantly disconnects the device from cellular networks and Wi-Fi, rendering “Find My” tracking useless in real-time. By default, the Control Center (where the Airplane Mode toggle lives) can be accessed even when the phone is locked.
You can prevent this by restricting access to the Control Center. This simple tweak forces the thief to unlock the phone (which they likely cannot do) before they can cut off its internet connection. This buys you valuable time to track the device or issue a remote wipe command.
How to Disable It:
1. Go to Settings and select “Face ID & Passcode.”
2. Enter your passcode.
3. Scroll down to the section labeled “Allow Access When Locked.”
4. Find “Control Center” and toggle the switch to the OFF position.
5. While you are here, consider also disabling “USB Accessories” to prevent unauthorized wired connections.
3. Supercharge Your Find My Settings
“Find My” is your primary tool for recovery, but many users do not realize there are deeper configurations within this feature that enhance its power. You need to ensure that your device can be found even if it is powered down or has no signal.
The “Find My network” feature utilizes millions of other Apple devices around the world to securely relay the location of your missing iPhone, even if it is offline. Additionally, “Send Last Location” ensures that if the battery creates a critical situation and dies, the phone will ping its final known spot to Apple servers right before shutting down.
How to Configure It:
1. Open Settings and tap on your Name/Apple ID banner at the very top.
2. Tap on “Find My” and then select “Find My iPhone.”
3. Ensure all three toggles are turned green: “Find My iPhone,” “Find My network,” and “Send Last Location.”
4. Switch to an Alphanumeric Passcode
As mentioned earlier, thieves often spy on victims to learn their four or six-digit numeric passcodes. Numbers are easy to memorize from a distance. An alphanumeric passcode (containing both letters and numbers) is exponentially harder for a shoulder surfer to memorize in a split second and significantly harder for brute-force software to crack.
Changing this setting elevates the complexity of your device security. While it might be slightly less convenient to type in a password than a PIN, the security trade-off is well worth it, especially given how often we use Face ID instead of manual entry.
How to Change It:
1. Navigate to “Face ID & Passcode” in Settings.
2. Select “Change Passcode.”
3. Enter your old passcode.
4. Before entering a new one, tap “Passcode Options” near the bottom of the screen.
5. Select “Custom Alphanumeric Code” and create a strong password.
5. Utilize Screen Time to Lock Account Changes
If you want an even stricter layer of protection that prevents a thief from signing you out of your Apple ID (even if they have your passcode), you can repurpose the Screen Time feature. This is a clever trick that acts as a secondary lock on your account settings.
By enabling Content & Privacy Restrictions, you can “gray out” the ability to make account changes. This means that even if someone gets into your phone, they cannot click on your Apple ID banner to change your password or disable iCloud tracking because the option will be unresponsive.
How to Set This Up:
1. Go to Settings and tap “Screen Time.”
2. Tap “Lock Screen Time Settings” and set a 4-digit PIN that is different from your main lock screen passcode.
3. Tap “Content & Privacy Restrictions” and toggle it on.
4. Scroll to the “Allow Changes” section.
5. Tap “Account Changes” and set it to “Don’t Allow.”
6. Tap “Passcode Changes” and set it to “Don’t Allow.”
6. Opt for eSIM Over Physical SIM
A common tactic for thieves is to immediately eject the physical SIM card from a stolen iPhone. This stops the phone from connecting to cellular data, preventing you from calling it or tracking it via the internet.
If your carrier supports it, switching to an eSIM (embedded SIM) eliminates this vulnerability. An eSIM cannot be physically removed. As long as the thief cannot unlock your phone to delete the eSIM profile (which requires your passcode or Face ID), the device will remain connected to the network, broadcasting its location for you to find.
7. Disable Lock Screen Previews
Notifications that pop up on your lock screen can reveal sensitive information, such as one-time passwords (OTPs) from banks or email resets. If a thief has your phone, they can use these visible codes to reset your accounts without ever unlocking the device.
To prevent this data leakage, you should configure your notification settings to only show message previews when the device is unlocked by your face.
How to Adjust Previews:
1. Go to Settings and tap “Notifications.”
2. Tap “Show Previews.”
3. Select “When Unlocked” or “Never.”
This ensures that even if your phone lights up with a message from your bank, the actual content of the message remains hidden until you verify your identity.
Securing your device is not a one-time task; it is an ongoing commitment to privacy and safety. By implementing the steps outlined above, you are creating a defense in depth that makes your iPhone a much less attractive target for criminals. Remember that technology evolves, and so do the tactics of thieves. It is vital to keep your iOS updated to the latest version to ensure you have the newest security patches and features like Stolen Device Protection.